Version Control using GIT
GIT is a powerful version control system that helps you track changes in your code and collaborate with others. This tutorial is aimed at beginners and will cover the basics of GIT.
How to install GIT
Before you can use GIT, you need to install it on your computer. Visit the official GIT website and download the installer for your operating system. Follow the installation instructions for your platform.
Configuring GIT
After installing GIT, you need to configure your name and email address. Open a terminal or command prompt and run the following commands, replacing "Your Name" and "your.email@example.com" with your actual name and email:
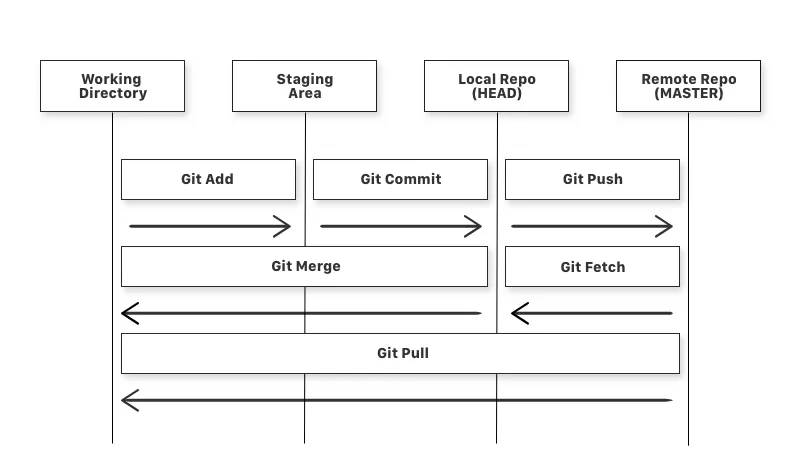
The Basic GIT Workflow
Develop a new feature aside from the project:
- Create a branch
- Making changes
- Staging changes
- Commit changes
- Push changes from local repository to remote repository
Integrate the new feature into the project.
- Create a Pull Request (Github) or Merge Request (Gitlab) remotely
- Merge Changes remotely
- Remove Branch remotely
- Pull Changes from remote repository to local repository
- Remove Branch locally
Creating a GIT Repository
A GIT repository is a place where you can store your project's code. Navigate to the directory where your project is located in the terminal and run the following command to initialize a new GIT repository:
Adding Files to the Repository
Before you can track changes, you need to add your project's files to the repository. You can add individual files or all files in the directory using the following commands:
Making Commits
A commit is a snapshot of the changes you've made. To commit your changes, use the following command:
Commit changes
Make sure to replace "Your commit message" with a brief description of what you've changed.
Working with Branches
Branches allow you to work on different features or parts of your project independently.

Merging Branches
When you're done with a branch, you can merge it into the main branch (usually "master" or "main").
How to merge a feature branch into the main branch
-
Switch to the main branch
-
Merge the other branch into the main branch
Sharing Your Code
You can share your GIT repository with others using platforms like GitHub or GitLab. Create an account on one of these platforms and follow their instructions for creating a new repository and pushing your code.
Step 10: Fetching, Pulling and Pushing Changes
How to fetch changes
Fetching checks if there is any change available in the remote repository
That's it! You now have a basic understanding of GIT. Remember that GIT is a powerful tool with many features and commands, so this tutorial is just the beginning. As you become more comfortable with GIT, you can explore advanced topics such as resolving conflicts, branching strategies, and more.